The modern production has a constantly increases demand for an impeccable work piece surface. The steadily rising requirements for a better surface roughness as well as high contact ratio presents an increasingly difficult task for tool development. Furthermore, the process needs to be as cheap and as quick as possible. Roller burnishing can achieve results that were previously only possible with slow and polluting processes like honing. Adding to that, roller burnishing presents other advantages that are not obvious.
- achievable surface roughness Rz< 1 µm
- fits are quickly, easily and cheaply produced
- only one process required
- high lifetime for wear parts
- processed surfaces are strain hardened and therefore have a higher wear resistance
- chipless and quiet process
- only one tool required
- can be used on almost every machine that produces a revolving motion
- barely any lubricant / cooling required
- can be used with any cooling supply
- improves the tribological characteristics
- improves fatigue strength
- reduces surface roughness up to 70 %
All our tools can be used on all sorts of turning and milling machines as well as production centers and transfer lines. They can process cylindrical drill holes, stepped and plane shafts, plane surfaces as well as tapered surfaces.
A few examples for products that require smooth surfaces:
- oil pumps and valves
- piston rods
- connecting rods
- bearing seat
- shafts
- hydraulic cylinders
- ball joints
- conical seats
- pistons
- gear parts
- clutch parts
The modern production has a constantly increases demand for an impeccable work piece surface. The steadily rising requirements for a better surface roughness as well as high contact ratio presents an increasingly difficult task for tool development. Furthermore, the process needs to be as cheap and as quick as possible. Roller burnishing can achieve results that were previously only possible with slow and polluting processes like honing. Adding to that, roller burnishing presents other advantages that are not obvious.
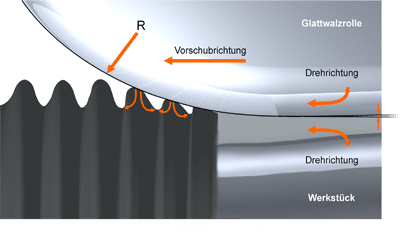
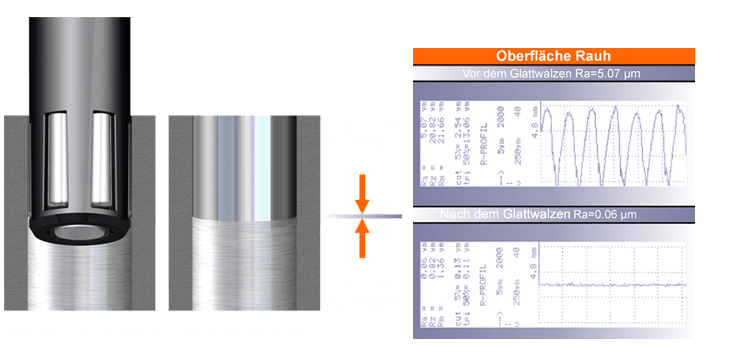
Essential to the success of the whole process are parameters such as roller force and the circumferential speed of the tool or the work piece. If you take a closer look at the process you might get the impression, that the spikes on the work piece surface were merely forced down – that is a misconception. The material flow is the key to a successful roller burnishing process. The compressive stress at the contact zone is high enough to surpass the yield strength of the material – plastic deformation is the result. This forces the spikes on the surface to be pushed down perpendicular to the surface and provokes a material flow that lifts material up into the open spots. Figure 1 will give you an idea how the process works on a micro scale and might help you understand how the end results will differ based on process speed and roller force. The process speed can differ greatly based on the material used and the required surface roughness. Figure 2 and 3 show a cylindrical work piece before and after roller burnishing with the resulting surface roughness.
- achievable surface roughness Rz< 1 µm
- fits are quickly, easily and cheaply produced
- only one process required
- high lifetime for wear parts
- processed surfaces are strain hardened and therefore have a higher wear resistance
- chipless and quiet process
- only one tool required
- can be used on almost every machine that produces a revolving motion
- barely any lubricant / cooling required
- can be used with any cooling supply
- improves the tribological characteristics
- improves fatigue strength
- reduces surface roughness up to 70 %
The machining allowance should be equal to the roughness of the work piece before the burnishing process. The remaining surface roughness will disappear almost completely and the dimension will shrink / grow accordingly. The surface roughness prior to the burnishing process is usually around Rz = 5 µm – 50 µm The result is highly dependent on the previously produced surface roughness therefore you should find a processing time that is fast enough to produce a surface that is ready for burnishing. Do not waste time on producing a surface which can easily be achieved by the burnishing process itself. Figure 2 will give you an impression of the remaining surface roughness after burnishing. It is obvious that the surface quality has greatly improved and only small imperfections remain. Those imperfections are necessary in most applications otherwise the resulting surface would be too smooth to make an oil film stick.
All our tools can be used on all sorts of turning and milling machines as well as production centers and transfer lines. They can process cylindrical drill holes, stepped and plane shafts, plane surfaces as well as tapered surfaces.
A few examples for products that require smooth surfaces:
- oil pumps and valves
- piston rods
- connecting rods
- bearing seat
- shafts
- hydraulic cylinders
- ball joints
- conical seats
- pistons
- gear parts
- clutch parts


